Core Simulator
Initializing the Simulator
The simulator is the first class you must instantiate. The simulator constructor has no arguments:
import moddy
simu = moddy.Sim()
The simu variable has to be passed to the parts.
Simulation Time
The simulator time is the virtual time seen by the model while the simulation is running. It has nothing to do with the real time of the computer running the simulation. It is important to understand that the simulation time does NOT advance while the model is executing a callback function (like a message receive or timer expiration callback). This means all python statements in a callback routine are executed at the same simulation time.
Time Unit
Moddy’s simulation time unit is seconds, i.e. the value 1.0 means one second. Because the simulator uses a floating point type for the simulation time, any time unit can be used by the model.
The globals MS (=1E-3), US (=1E-6) and NS (=1E-9) can be used conveniently to specify short times. Example:
from moddy import MS

...
mypart.port1.send('down', 1*MS)
The 1*MS passes the value (1*1E-3) = 0.001 to the send function.
Setting the Time Unit for Trace Outputs during Simulation
To define the time unit for simulation outputs, use
simu.tracing.set_display_time_unit( unit )
where unit can be “s”, “ms”, “us” or “ns”.
This setting affects only the trace outputs during the simulation run:
TRC:       8.9s STA     Joe(Block) //
TRC:       8.9s >MSG    Joe.mouth(OutPort) // req=8.9s beg=8.9s end=10.4s dur=1.5s msg=[Fine]
It does not affect the Sequence diagram time unit or the csv table output.
Parts
Parts are the component of the system that communicate to each other.
They are the base elements to form the structure of a model.
You create a part by creating an instance of a class derived from SimPart.
This derived class contains the model code implementing the behavior of the part:
The parts initialization code
The port receive methods
The timer expired methods
Optionally: Methods that are executed at the beginning and the end of the simulation. (
start_sim()andterminate_sim())
Here is a simple example of a part class derived from SimPart.
For Python beginners: The self variable that is used in ever method is the reference to the own part (comparable with this in C++).
import moddy
class Bob(moddy.SimPart):
    ''' Model of Bob '''
    def __init__(self, sim, obj_name):
        # Initialize the parent class
        super().__init__(sim=sim, obj_name=obj_name,
                        elems={'in': 'ears',
                                'out': 'mouth',
                                'tmr': 'think_tmr'})

        self.reply = ""

    def ears_recv(self, _, msg):
        ''' Callback for message reception on ears port '''
        if msg == "Hi, How are you?":
            self.reply = "How are you?"
        else:
            self.reply = "Hm?"

        # pylint: disable=no-member
        self.think_tmr.start(1.4)
        self.set_state_indicator("Think")

    def think_tmr_expired(self, _):
        ''' Callback for think_tmr expiration '''
        self.set_state_indicator("")
        # pylint: disable=no-member
        self.mouth.send(self.reply, 1)

    def start_sim(self):
        # Let Bob start talking
        # pylint: disable=no-member
        self.mouth.send("Hi Joe", 1)
SimPart Constructor Parameters
Each part must call the SimPart’s constructor in it’s __init__ method.
class SimPart(SimBaseElement):
    """an instance of SimPart forms a moddy object

    :param sim: Simulator instance
    :param obj_name: part's name
    :param parent_obj: parent part. None if part has no parent. Defaults to None
    :param dict elems: A dictionary with elements (ports and timers) to \
    create, \
    e.g. ``{ 'in': 'inPort1', 'out': ['outPort1', 'outPort2'], 'tmr' :
    'timer1' }``
    """
Example:
class Bob(moddy.SimPart):
    ''' Model of Bob '''
    def __init__(self, sim, obj_name):
        # Initialize the parent class
        super().__init__(sim=sim, obj_name=obj_name,
                         elems={'in': 'ears')}
SimPart Methods Called on Start and End of Simulation
Optionally, a part may define methods that are called at the start or end of simulation.
def start_sim(self):
    '''Called from simulator when simulation begins'''

def terminate_sim(self):
    '''Called from simulator when simulation stops. Terminate part (e.g. stop threads)'''
If present, the start_sim() method is called at the start of the simulation (i.e. at simulation time 0).
The simulator calls the start_sim() method of all parts at the beginning of its run() method,
in the order the parts have been created. The typical actions in the start_sim() routine are
starting timers
sending initial messages
If present, the terminate_sim() method is called by the simulator when the simulation is terminated,
in the order the parts have been created. Typical actions of terminate_sim() are
stopping threads
closing files
Nested Parts
You can model parts that are composed of other parts. For example, the part engine may be part of the part car. To model this, you use the SimPart constructors parent_obj argument.
class Engine(moddy.SimPart):
    def __init__(self, sim, obj_name, car):
        # Initialize the base class
        super().__init__(sim=sim, obj_name=obj_name, parent_obj=car)
  ...
class Car(moddy.SimPart):
    def __init__(self, sim, obj_name):
        # Initialize the base class
        super().__init__(sim=sim, obj_name=obj_name)
        self.engine = Engine(sim, 'engine', self)
Note
The part hierarchy has no relevance for the simulator. The part hierarchy however is displayed in the structure graph, trace output and in the sequence diagrams.
Message Communication
Parts can communicate only via messages that are sent from an output port to an input port. More about messages in chapter Messages.
Output ports can only send messages, they cannot receive.
Input ports can only receive messages, they cannot send.
There is also an IO Port, but this is nothing else as an object containing one input and one output port.
In general, a message that is sent via an output port, is received after the “flight Time” at the input port. The flight time simulates the transmission time of the message.
Creating Ports
All ports of a part must be explicitly created by a part. This is usually done in the constructor (__init__ method) of the part owning the port. Note that a port is always owned by exactly one part.
There are three ways to create ports:
Using the low level methods:
Example:
class Bob(moddy.SimPart):
    def __init__(self, sim, obj_name):
      ...
        self.ears = self.new_input_port( 'ears', self.ears_recv )
This creates a new input port with the name ears and assigns the method ears_recv() as the callback method. The resulting port object is assigned to the part variable ears.
The creation of an IO port is similar:
self.my_io_port_1 = self.new_io_Port( 'io_port_1', self.io_port_1_recv )
An output port has no receive callback method:
self.my_out_port_1 = self.newOutoutPort( 'out_port_1' )
To reduce the amount of typing, you can call the higher level function create_ports().
class Bob(moddy.SimPart):
    def __init__(self, sim, obj_name):
        ...
        self.create_ports('in', ['ears'])
This essentially does exactly the same as the low level function above.
It creates a new port object, creates a new part variable self.ears and assigns the callback method ears_recv.
This means that your callback function MUST always be named <portName>_recv.
You can also create multiple ports with one call:
self.create_ports('in', ['in_port_1', 'in_port_2', 'in_port_3'])
Output ports and IO ports can be created with the same method:
self.create_ports('out', ['out_port_1', 'out_port_2', 'out_port_3'])
self.create_ports('io', ['io_port_1', 'io_port_2', 'io_port_3'])
Usually, you will always use the high level methods, unless you need to create several input ports that have the same receive method.
Since Moddy 1.8, ports can be created even more simpler through the elems parameter to the
SimPart constructor. This is essentially the same as using the create_ports()
method, but requires less typing:
class Bob(moddy.SimPart):
    def __init__(self, sim, obj_name):
        # Initialize the parent class
        super().__init__(sim=sim, obj_name=obj_name,
                         elems = {'in': 'ears',
                                  'out': 'mouth',
                                  'tmr': 'think_tmr'})
Binding Ports
Before a message can be sent between parts, someone must bind the output port of one object to the input port of another object.
This binding is done normally by the main program. If you have parts that are composed of other parts,
then the internal bindings within the top level part are done in the top level parts constructor.
To bind an input port to an output port, you call the output ports bind() method:
bob.mouth.bind(joe.ears)
You can bind several input ports to one output board to simulate multicast transfer.
bob.mouth.bind(joe.ears)
bob.mouth.bind(john.ears)
bob.mouth.bind(paul.ears)
Since Moddy 1.8, you can bind several output ports to one input port:
bob.mouth.bind(joe.ears)
paul.mouth.bind(joe.ears)
You can also bind IO ports to each other. In this case the output port of the first IO port is bound to the input port of the second port and vice versa. It doesn’t matter on which IO port you call the bind method.
class myPart(moddy.SimPart):
    def __init__(self, sim, obj_name):
      ...
        self.create_ports('io', ['io_port_1'])

part1 = myPart( simu, 'part1' )
part2 = myPart( simu, 'part2' )
part1.io_port_1.bind( part2.io_port_1 )
If you need to bind an IO port to a normal input and normal output port, you can do it like this:
Consider part1 has an ioport called io_port_1 and part2 has one input port in_port_1 and an output port out_port_1:
part1.io_port_1._outPort.bind( part2.in_port_1 )
part2.out_port_1.bind( part1.io_port_1._inPort )
You can also loop an ioport’s input and output port. This can be used to delay the processing of messages. What you send to the output port will be received after the flight time at the input port:
io_port.loop_bind()
Since Moddy 1.8, there is a new function smart_bind() method. This method should
be used at the top level to bind all ports with a single call. In contrast to the
classic bind() method, you specify the hierarchy name of the ports
as a string, instead of using their python references.
Example:
simu.smart_bind( [
    ['App.out_port_1', 'Dev1.in_port', 'Dev2.in_port'],             # binds the 3 ports together
    ['App.io_port_1', 'Server.net_port' ]  ])                               # binds the 2 ports together
Note
If an input and output port that shall be bound belongs to the same part, then messages sent over this binding are called “messages to self”. The interactive viewer displays these messages, while the static svg diagrams do not display them.
Sending Messages
A message between two parts is sent via an output port’s send() routine:
send( msg, flight_time )
- Where
msg is the message you want to send (More about messages in chapter Messages)
flight_time is the transmission time of the message; i.e. how long it takes until the message arrives at the input port. flight_time must be a positive value in seconds. flight_time can be 0; in this case, the message arrives without delay at the bound input ports.
The send method has no return value.
What happens if you call the send method on a port which is already sending a message (meaning: the flight time of one or more previous messages has not elapsed)?
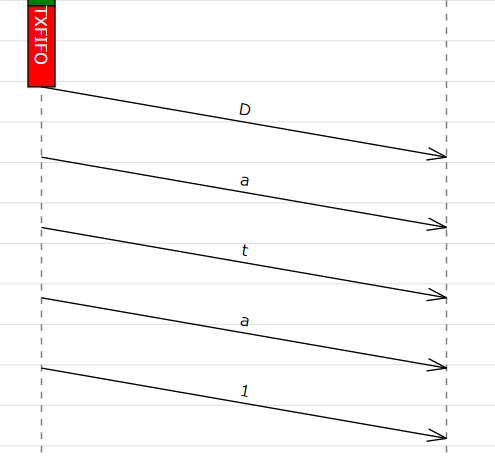
In this case, the output port queues the pending messages one after each other. When a messages flight time has elapsed, the next message from the queue is sent. This simulates the behavior of a serial transmission. See the following snapshot from the tutorial Serial Gateway. Here, multiple send() calls are issued at the same simulation time.
self.busy( len(msg) * 20*US, 'TXFIFO', moddy.BC_WHITE_ON_RED)

 # push to serial port
 for c in msg:
     self.ser_port.send( c, ser_flight_time(c))
This results in the following sequence diagram. You see that the next character is fired when the previous character transmission ends:
Receiving Messages
When a message is received on an input port, the input ports callback method is called.
This receive method must be provided by the model, usually in the class derived from SimPart.
When you have created the port with create_ports(), the method is called <portName>Recv:
class Bob(moddy.SimPart):
    def __init__(self, sim, obj_name):
     ...
        self.create_ports('in', ['ears'])

    def ears_recv(self, port, msg):
        if msg == "Hi, How are you?":
            self.reply = "How are you?"
        else:
            self.reply = "Hm?"

        self.think_tmr.start(1.4)
The receive callback method gets passed two parameters:
port is the input port on which the message was received. You can use this to find out which port received the message in case you have assigned the same receive method to multiple ports
msg is the message just received
The receive callback method does not return a value.
Note that you get a copy of the message sent by the caller, so you can modify or even delete the message content without affecting the sender or other receivers of the message. More specifically, msg is a “deep copy” of the original message; this means that also objects that are referenced in the message are copied.
The usual task of receive callback method is to start timers or to send messages to other objects.
Message Start Notification
Sometimes a message receiver needs to know when a message transmission starts. However, the standard input port callback is called at when the transmission is finished.
If you want to get notified when a message transmission is started, you can register a function
with set_msg_started_func() :
Example:
class NetPort():
    def __init__(self):

        # create network port
        # Create an IO port, but don't install the normal receive callback
        # Instead, install a function that gets called on message transmission start
        self._net_port = switch.new_io_Port('net_port', None)
        self._net_port.set_msg_started_func(self.net_port_recv_start)

    def net_port_recv_start(self, in_port, msg, out_port, flight_time):
        # gets called on message start
Messages
What type of data can be transferred between output and input ports? Generally, any valid python object can be a Moddy message, such as:
Numbers, e.g. 1.0
Strings, e.g. ‘abc’
Lists, e.g. [‘abc’, 1.0, 2]
User defined classes
Moddy does not force any specific type to be used as a message. However, the model must be written in a way that the receiver understands the messages the sender might generate.
Here is an example of a user defined message. It simulates the behaviour of “Fail Safe over EtherCAT” (it does not really implement all fields of FSoE, it only includes the necessary information needed for that model):
class FsoeMsg:
    def __init__(self, addr, seq, data ):
        self.addr = addr   # FSoE Address
        self.seq = seq     # sequence number
        self.data = data   # FSoE Payload
To send such a message, you could call from a part’s method:
self.out_port_1.send( FsoeMsg(self.fsoe_addr, seq, 'TESTDATA', msg_flight_time )
Warning
Do NOT include a reference to the simulator instance, parts, ports or timers into the user defined messages! This may cause an exception when sending such messages (because it causes endless recursion while trying to make a deep copy of the message).
Message Content Display
How are message contents displayed in sequence diagrams and trace tables?
Moddy calls the object’s __str__() method. This method should generate a user readable string with the message content. For the built-in classes, python defines the __str__() method. For user defined classes, you must implement it:
class FsoeMsg:
    ...
    def __str__(self):
        return "FSoE @%d#%d %s" % (self.addr, self.seq, self.data)
Example output: "FSOE @2#3 'ABC'" -> meaning: FSOE message to slave 2, sequence 3, with data 'ABC'.
Checking Message Types
If the receiver wants to check if the received message is of the correct type, he can use the python type()
method, here are some examples:
if type(msg) is int:
...
if type(msg) is float:
...
if type(msg) is str:
...
if type(msg) is list:
...
if type(msg) is FsoeMsg:
...
Message Colors
You can influence the color in which messages are displayed in the sequence diagram. By default, the messages are drawn in “black”. You can assign a color to an output port, e.g.
my_out_port.set_color("green")
In this case, all messages sent via this output ports are drawn in green.
You can even assign different colors to individual messages. To do so, create a member msg_color inside a (user defined) message:
class FsoeMsg:

    def __init__(self, addr, seq, data, msg_color=None ):
        self.addr = addr   # FSoE Address
        self.seq = seq     # sequence number
        self.data = data   # FSoE Payload
        if msg_color is not None: self.msg_color = msg_color
If the msg_color member exists, this message will get the define msg_color, overriding the color which might have been assigned to the port.
Simulating Lost Messages
You can force messages to be lost to simulate disturbed communication.
Therefore, output port and I/O Ports provide an API to inject a “message lost error”.
If you call the inject_lost_message_error_by_sequence() method of an output port you can force one or
more of the following messages sent on this port to be lost.
inject_lost_message_error_by_sequence(0) will force the next message sent on that port to be lost,
inject_lost_message_error_by_sequence(1) the next but one message and so forth.
Lost messages will not arrive at the input port.
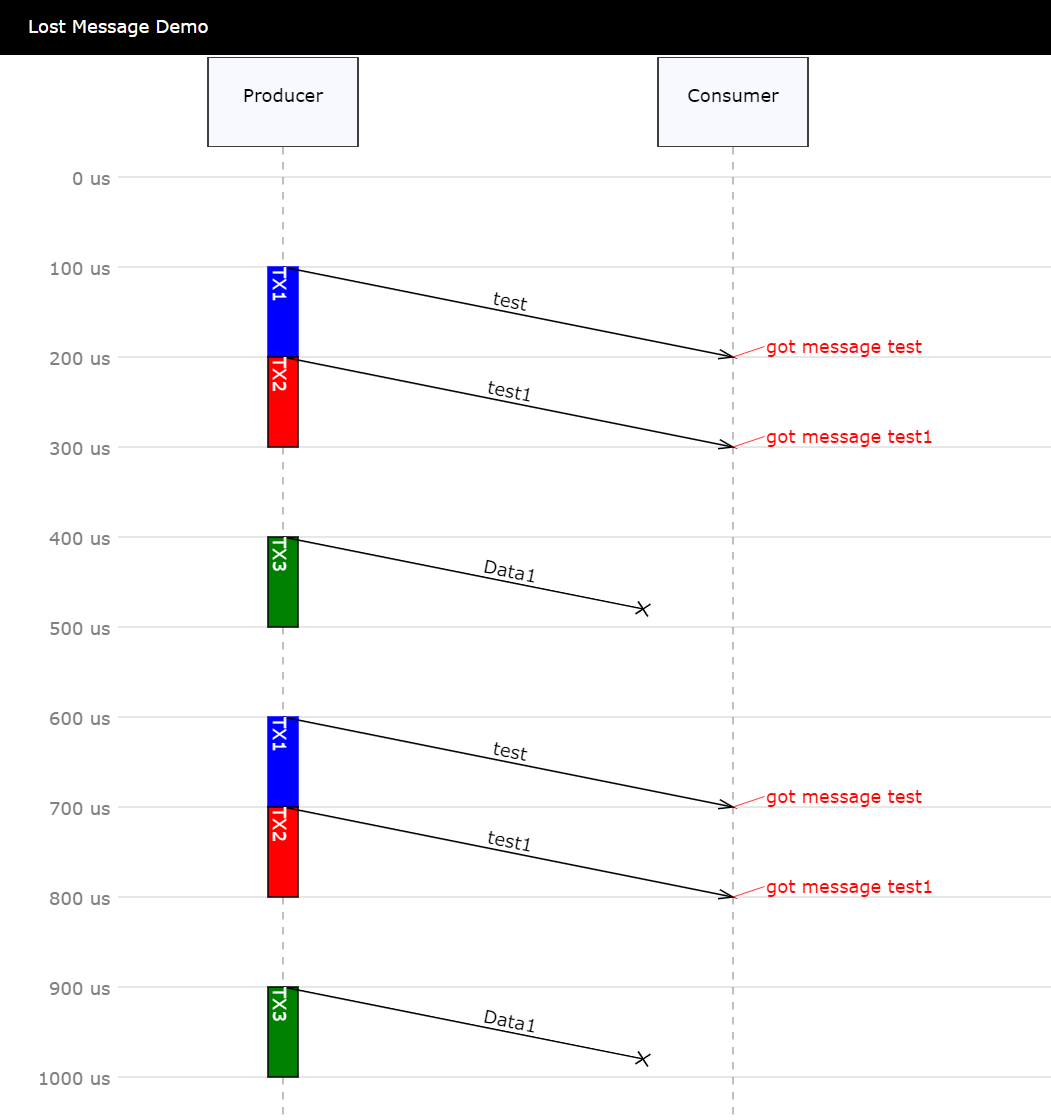
For example:
class Producer(moddy.VSimpleProg):
    def __init__(self, sim):
        super().__init__(sim=sim, obj_name="Producer", parent_obj=None)
        self.create_ports('out', ['net_port'])

    def run_vthread(self):
        self.net_port.inject_lost_message_error_by_sequence(2)
        self.net_port.inject_lost_message_error_by_sequence(5)
        self.net_port.inject_lost_message_error_by_sequence(6)
        while True:
            self.wait(100*US)
            self.net_port.send('test', 100*US)
            self.busy(100*US, 'TX1', moddy.BC_WHITE_ON_BLUE)
            self.net_port.send('test1', 100*US)
            self.busy(100*US, 'TX2', moddy.BC_WHITE_ON_RED)
            self.wait(100*US)
            self.net_port.send('Data1', 100*US)
            self.busy(100*US, 'TX3', moddy.BC_WHITE_ON_GREEN)
will force the 3rd, 6th and 7th message on the net_port to be lost.
In the sequence diagrams, lost messages are indicated by an cross in front of the message arrow:
In the simulator trace output, a lost message is shown as a normal message reception event, but with the additional “(LOST)” string:
TRC: 500.0us <MSG Consumer.net_port(InPort) // (LOST) req=400.0us beg=400.0us end=500.0us dur=100.0us msg=[Data1]
Timers
Timers are - beside messages - another way of triggering actions in a part.
Typically, timers are used to
Trigger periodic actions
Provide timeout for message reception
A timer is started and stopped from a part’s methods. When the timer expires, an “expiration callback” method is called within the part.
Creating Timers
A part can have any number of timers. All timers of a part must be explicitly created by a part. This is usually done in the constructor (__init__ method) of the part owning the timer. There are two ways to create timers: Using the low level method new_timer():
class Bob(moddy.SimPart):
    def __init__(self, sim, obj_name):
      ...
        self.thinkTmr = self.new_timer( 'think_tmr', self.think_tmr_expired )
This creates a new timer with the name think_tmr and assigns the method think_tmr_expired() as the callback method. The resulting timer object is assigned to the part variable thinkTmr.
To reduce the amount of typing, you can call the higher level function create_timers().
class Bob(moddy.SimPart):
    def __init__(self, sim, obj_name):
        ...
        self.create_timers(['think_tmr'])
This essentially does exactly the same as the low level function above. It creates a new timer object, creates a new part variable self.think_tmr and assigns the callback method think_tmr_expired.
This means that your callback function MUST always be named <timerName>_expired.
You can also create multiple timers with one call:
self.create_timers(['tmr1', 'tmr2'])
Since Moddy 1.8, timers can be created even more simpler through the elems parameter to the
SimPart constructor. This is essentially the same as using the create_timers()
method, but requires less typing:
class Bob(moddy.SimPart):
    def __init__(self, sim, obj_name):
        # Initialize the parent class
        super().__init__(sim=sim, obj_name=obj_name,
                         elems = {'in': 'ears',
                                  'out': 'mouth',
                                  'tmr': 'thinkTmr'})
Starting and Stopping Timers
Each timer has two states: Started and Stopped.
You start a timer with start() or restart().
self.think_tmr.start(2)
self.think_tmr.restart(2)
Both expect the timer’s expiration time, relative to the current simulation time, in seconds (in the examples above: 2 seconds). They do not return a value.
The start() method throws an exception if you use it on a timer which is already started.
The restart() method starts a timer with the specified time regardless of the timers state.
Both methods bring the timer into the started state.
You stop a timer with stop() method. It brings the timer into the stopped state.
In other words, you cancel the timer.
self.think_tmr.stop()
Timer Expiration Callback
When a timer expires, the timer’s callback method is called.
This callback method must be provided by the model, usually in the class derived from SimPart.
When you have created the port with create_timers(), the method is called <timerName>_expired:
class Bob(moddy.SimPart):
    def __init__(self, sim, obj_name):
     ...
        self.create_timers(['think_tmr'])

    def think_tmr_expired(self, timer):
        self.mouth.send(self.reply, 1)
The timer expired callback gets passed the timer parameter, which is the timer object that has expired. You can use this to find out which timer expired in case you have assigned the same callback methods to multiple timers.
The callback method does not return a value.
The usual task of receive callback method is to re-start this timer, start other timers or to send messages to other objects.
Annotations
The model can add annotations to the output (i.e. sequence diagrams and trace tables) to visualize special events in the model.
You add an annotation by calling the SimPart’s annotation() method:
class Joe(moddy.SimPart):

    def earsRecv(self, port, msg):
        self.annotation('got message ' + msg)
In a sequence diagram, an annotation is displayed on the part’s life line at the current simulation time:
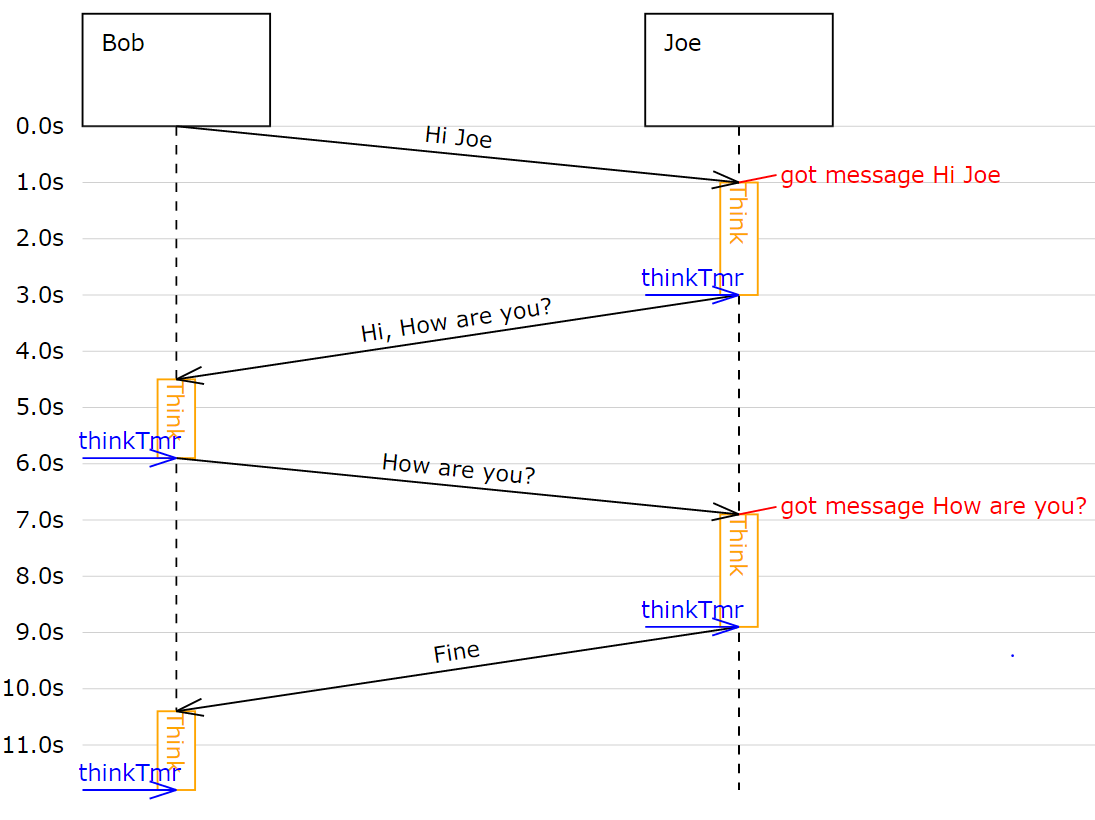
The annotation() method expects a string as its argument.
It must be a single-line string. No special characters such as newline are allowed.
State Indications
To visualize a part’s state or to indicate which activity the part is currently performing,
you can use state indications. For this, you call the part’s set_state_indicator() method:
class Bob(moddy.SimPart):
     ...
    def earsRecv(self, port, msg):
        ...
        self.set_state_indicator("Think")


    def think_tmr_expired(self, timer):
        self.set_state_indicator("")
The first parameter to set_state_indicator() is text:
A non-empty string indicates the start of a new state or activity. The text is displayed in sequence diagrams in vertical direction.
An empty string ends the state or activity
The second, optional parameter to set_state_indicator is appearance. With this parameter, you can control the colors of state indicator. If present, it must be a python dictionary like this:
{'boxStrokeColor':'black', 'boxFillColor':'green', 'textColor':'white'}
Where:
boxStrokeColor: is the color of the status box’s border
boxFillColor: is the color of box body
textColor: is the color of the text
Color names are according to the SVG specification, see <http://www.december.com/html/spec/colorsvg.html>_ for an overview.
If the appearance argument is omitted, it defaults to:
{'boxStrokeColor':'orange', 'boxFillColor':'white', 'textColor':'orange'}
Watching Variables
Sometimes it is useful to watch the value of variables and how they are changing during simulation.
Tell Moddy which variables to watch. You do this by calling the new_var_watcher() method of a moddy part:
class VarChanger(moddy.VSimpleProg):
    def __init__(self, sim):
        super().__init__(sim=sim, obj_name="VC", parent_obj=None)
        self.var1 = 0
        # self.var2 is created during execution

    def run_vthread(self):
        while True:
            self.var1 = 1
            self.wait(2)

            self.var1 = 2
            self.var2 = "ABC"

if __name__ == '__main__':
    simu = moddy.Sim()
    vc = VarChanger(simu)
    var1watch = vc.new_var_watcher('var1', "0x%08x")
    var2watch = vc.new_var_watcher('var2', "%s")
new_var_watcher() expects as the first parameter the name of the variable to watch as a string,
e.g. “var1”, or “subobj.var2” etc. The variable doesn’t need to exist yet.
As shown in the above example for var2, it can be created during runtime.
The second parameter to new_var_watcher is the format string that is used to format the variables value, e.g. 0x%08x"
When you run now the simulator, you will see a “VC” event every time the value of a watched variable changes:
0.0s VC VC.var1(WatchedVar) // 0x00000001
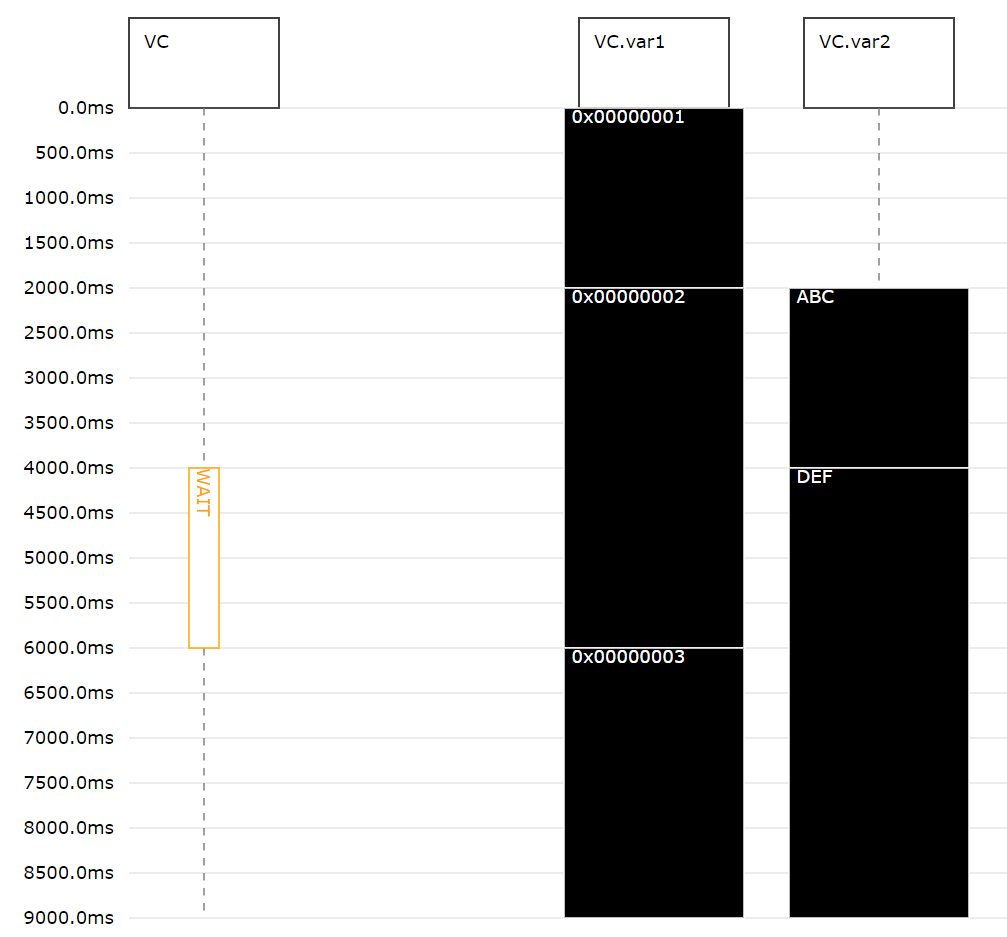
Watched variables can be included in the sequence diagram. In the following examples, you see the status of a Moddy part VC, and its two internal variables var1 and var2. Variable traces will be shown always on the right side of the sequence diagram.
You define with the parameter show_var_list which variable traces are shown in the sequence diagram:
moddy.gen_interactive_sequence_diagram( sim=simu,
                                        file_name="4_varwatch.html",
                                        show_parts_list=['VC'],
                                        show_var_list=['VC.var1', 'VC.var2'],
                                        excluded_element_List=['allTimers'],
                                        time_per_div = 0.5,
                                        pix_per_div = 30)
Running the Simulation
After the instantiation of the simulator, the creation of the parts,
ports and the binding of the ports, you can run() the simulation:
# let simulator run
simu.run(stop_time=12.0, max_events=10000, enable_trace_printing=True,
         stop_on_assertion_failure=True)
This will run the simulation until one of the following conditions are met:
stop_time has been reached
The simulator has processed a maximum number of event max_events. If this argument is omitted, it defaults to 100000. You can pass also None, to allow infinite number of events.
The simulator has no more events to execute
An exception was raised (either by the model or the simulator)
An assertion failure occurred. Pass
stop_on_assertion_failure=Falseto continue simulation in case of assertion failures.
With enable_trace_printing, you can control whether the simulator prints each event while executing.
The run method does not return a value.
Catching Model Exceptions
When the model code throws an exception, the simulator stops. If you want to generate the output files even in this case (to show the events that have been recorded until then), you can catch the simulators exception like this:
# let simulator run
    try:
        simu.run(stop_time=12*MS)

    except Exception: raise
    finally:
        # create SVG drawing
        moddy.gen_interactive_sequence_diagram( sim=simu,
                                                ...